🎉🧪 You can now become an official Cryptotester member by minting the new Tester Membership NFTs. 🥳🎊
Click here for details ⇗
Key Facts
In short
- Seamless backup via physical SafeCards
- Human-readable transactions on big screen
- Automatic delete upon physical intrustion attempt
- More expensive than other hardware wallets
Coins
Ether, Bitcoin, Ethereum Tokens.
Integrations
Metamask, 0xFrame, MyCrypto.
Price
$397
Release Year
2021
Rating
Score
9.5 / 10
Rating Breakdown
Features
5
Usability
5
Onboarding
4
Support
5
About Lattice1
What we like about Lattice1
- Top-notch security at hardware and software level
- Big screen and decoded smart contract functions
- Built by wordclass team that iterates fast and knows what user want
What we dislike about Lattice1
- No support for non-EVM chains
- Doesn't come with international power adapters
- High price
Promotion
10% off through Cryptotesters
It is common knowledge that you need a hardware wallet to properly self-custody your funds. So called hot wallets where private keys are stored on an internet connected-device like a smartphone or laptop are vulnerable to hacks. It’s enough to download a file sent by a stranger on a Discord group that contains some malware to get access to your private keys stored on your device.
Hardware wallets offer an additional layer of security by allowing users to store the private key on a special piece of secure hardware that makes it virtually impossible for hackers to extract the keys. Whereas a hot wallet entails initiating and signing a transaction within the wallet app, using a hardware wallet allows you to only initiate the transaction on your laptop or smartphone and then do the signature on the hardware device.
However, hardware wallets come with their own set of problems. One which is often cited is the bad user experience which can create its own security issues. Many of the first generation hardware wallets were designed before the emergence of DeFi and NFT’s where users mostly kept their coins offline and only required their hardware wallet once in a while to move funds to a centralized exchange. The modern Web3 user makes dozens of transactions a day and uses a a multitude of different decentralized applications (more on that later.).
The two most popular hardware wallets up to recently were Ledger and Trezor which gained in popularity and adoption simply because they were the first in the market. The Lattice 1 by Grid was developed by a group of engineers and cryptography experts that recognized that a modern hardware wallet should not only be optimized for security but also for active use.

Unboxing & Set-up Experience
The Lattice 1 comes in a pleasant card box in which you will find the main device, two Safecards as well as a power and LAN cable. The only annoying thing is that the powercable is suited for a US-plug and comes without international adapters. Supposedly the team is working on letting users order custom plugs in the near future.
1. Connect to Power
Once you connect your Lattice to a wall socket via the power supply, you will see a starting up screen with the GridPlus logo on it and then, the system will initialize. This can take a few minutes.
2. Connect to Internet
When the system initialization is finished, you will see the welcome screen with all the steps you need to take to start using your Lattice1 listed. The first step entails connecting your Lattice to the Internet - either via your home WiFi or the Ethernet cable.
Personally, I had some issues connecting via WiFi because the Lattice1's WiFi module supports 2.4 GHz only and I couldn’t be bothered to go through the WiFi Troubleshooting docs and edit my WiFi settings, so I connected via Ethernet.
3. Choose PIN
The next step is to create a system PIN which you will use to unlock your Lattice1. Enter a 4-6 digit PIN and confirm it in the next step. You can change your PIN at any time.
4. Lattice Wallet Setup
Once you have a PIN, tap on Let's go to set up a wallet. You now have three options:
-
Generate Wallet
-
Restore from Seed Phrase
-
Restore from SafeCard If you're a first-time user, you will not have a SafeCard from which you can restore a wallet, so you’ll either choose Generate wallet or Restore from Seed Phrase.
Generate wallet will generate a completely new wallet for you that has never touched any insecure device. If you already have a wallet like a hot Metamask wallet where the keys are stored inside the computer you can choose Restore from Seed phrase to import that wallet including all its funds into the Lattice. If you choose to do the latter option you would typically wipe the private keys from your Metamask wallet off the computer or smartphone otherwise it would defeat the purpose of buying a hardware wallet.
5. SafeCard Backup
The last step of initial device setup consists of backing up your wallet to a SafeCard. This step is optional but highly recommended as the name says the SafeCard is there to provide additional safety. If you lose your Lattice divide you would need a Safecard to restore your wallet and regain access to your funds. To backup your wallet you simply need to insert your SafeCard into the Lattice’s card slot, setup a new 6 digit PIN for the SafeCard and then tap on “Yes” to complete the wallet backup. After a few moments, the device will prompt you to remove the SafeCard and you’re done.
Connecting your Lattice Hardware wallet to Metamask
Of course you will want to use your Lattice wallet on an everyday basis and the easiest way to do that is to connect it to a popular software wallet like Metamask or 0xFrame. Since Metamask is by far the most popular and widely adopted software wallet we’ll quickly go through the steps required to connect your Lattice to it.
1. Download Metamask and Set-up a wallet
What might seem a bit odd is that to connect your Lattice to Metamask you will have to create a new Metamask wallet including a new seed phrase because MetaMask has to have a default wallet (Account 1) and this default wallet cannot be a hardware wallet. You don’t need to worry too much about the seed phrase of that account as that Account1 will be empty for all means and purposes.
2. Connect Hardware Wallet
After you have set-up Metamask you can go into Settings and click on Connect Hardware Wallet. This will open a new browser window where you will be prompted to enter your Lattice Device ID, which you can find in the menu of your Lattice, as well as to set a password.
3. Enter Pairing Secret
Once that’s done a pairing secret will appear on the screen of your Lattice which you have to enter once again in the browser window.
4. Import Lattice Accounts
In the last step, after you have successfully paired your Lattice, Metamask will ask you which accounts from your Lattice you want to import. Each address will create a new Metamask account and will feature a little “Hardware” tag to show you it’s a hardware wallet account. All transaction requests from these accounts will also require your approval on the hardware screen.

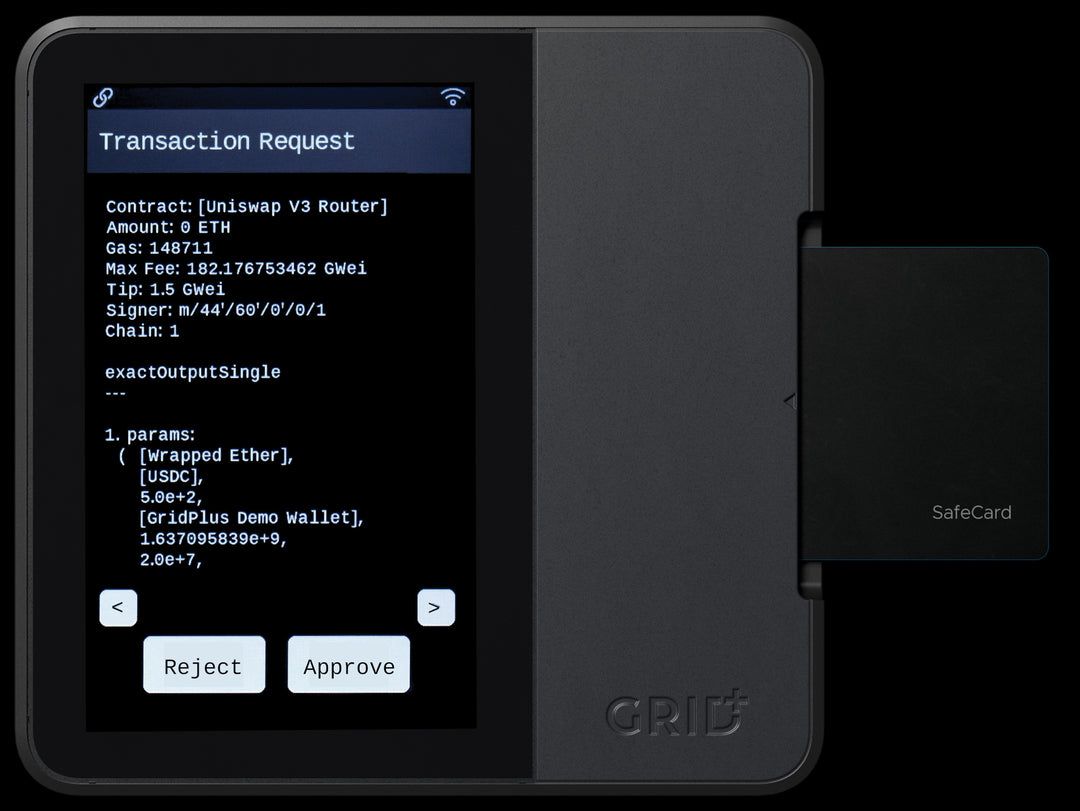
Using the Lattice Hardware wallet with Metamask
When you use Metamask with the Lattice1 it’s almost the same as using the app without a hardware wallet - the only difference is that all transaction requests will have to be signed on the Lattice1 and you will get to approve all of them on the device screen.
This approval process is where the Lattice really shines compared to other thumb-sized hardware wallets. The Lattice has a 5" TFT touchscreen with great readability instead of a tiny screen that forces you to scroll through hex strings 8 bytes at a time. The Lattice is the first hardware wallet that supports human readable signing so you know exactly what you’re signing, greatly reducing the risk of an exploit where you sign something malicious (e.g a phishing website that looks like Uniswap but makes you approve a bad transaction).
Gridplus, the company behind Lattice, has decompiled the most common smart contracts into this human readable format and you can download them in the Lattice Manager app.
Lattice Security
Reading through the Security docs of the Lattice you realize this device has been built by some paranoiac engineers who really thought of every attack angle a hardware wallet can be subjected to - yes even a hacker trying to intercept the radio frequency emissions to decrypt sensitive information.
For starters, the Lattice has two totally separate hardware environments inside the box - General Compute Environment (GCE) and the Secure Compute Environment (SCE, also sometimes called Hardware Security Module, HSM). You can think of them as two independent computers that can communicate with each other (we'll get to how they do this) but they are still segregated at the component level. Both the GCE and the SCE are responsible for different tasks that need to be performed in order for the Lattice1 to properly work.
The most security sensitive operations such as communicating with the GCE, getting transaction messages signed, generating screen image etc. are reserved to the SCE microprocessor. All these secure elements inside the Lattice1 are enclosed in an anti-tamper mesh which literally acts like an alarm system that will erase your secrets if a physical intrusion attempt is detected.
Conclusion
In conclusion, the Lattice 1 is the best hardware wallet we have discovered so far. It combines best-in-class security and usability and the team is eager to continue develop the Lattice 1 to satisfy users. Today, it supports Ethereum & Bitcoin + all EVM networks (Polygon, Avalanche etc.) and it’s working on adding non-EVM networks such as Terra and Solana. One area where Gridplus needs to step up its game is on the logistics side. Throughout 2021 they couldn’t keep up with the demand for the Lattice1 causing backlogs and preventing more users from ordering the device.
We are a multi-faceted team of crypto enthusiasts based in Berlin.
© 2021 cryptotesters UG
Products
Cryptocurrency exchanges
Crypto wallet guide
Crypto savings accounts
Defi lending rates
Crypto cards
Exclusive crypto deals
Ethereum staking
Resources
Articles
Reviews
Podcasts
Tutorials
We are a multi-faceted team of crypto enthusiasts based in Berlin.
© 2021 cryptotesters UG